Docker

What You'll Need
A Computer
These notes were created during an installation on a used, older i5-based ex-Windows machine, running Debian 13 Server. Its purpose: to serve as a 'Cloud Server'—outward-facing—very much like iCloud or GoogleDrive, but better.
Note: there is no GUI on this system and no monitor attached—it's not needed after the initial install. You might as well get used to life in Terminal: this how you'll do a lot of your work.
Specs
- 8 gig RAM
- low-end graphics card (can be removed after initial installation)
- Storage: main of at least a terabyte, possibly additional drives
Another PC
A laptop is fine—you will need it to administrate the server.
Internet Access
This server will be an always-on box, ready to serve files like OneDrive or GoogleDrive. Broadband of some sort is a must-have. We have fibre-to-the-premises (FTTP), but fibre-to-the-node (FTTN) should work fine, if a tad slower.
Note: this is my second box set up as "cloud server"—my first is a Raspberry Pi. Yes, you read that right. These instructions came from Emily, my ChatGPT bot. I'm a heavy user: I have been able to accomplish things thanks to Emily I was never able to before. Don't knock it till you've tried it.
🌺
First Steps
Install the OS
This is easiest if done with keyboard and monitor attached. For the Raspberry PI, these instructions worked well for me, for the most part. I did end up having to attach a monitor to the Pi to discover that the SSH service wasn't running. Other videos might cover a Pi install better.
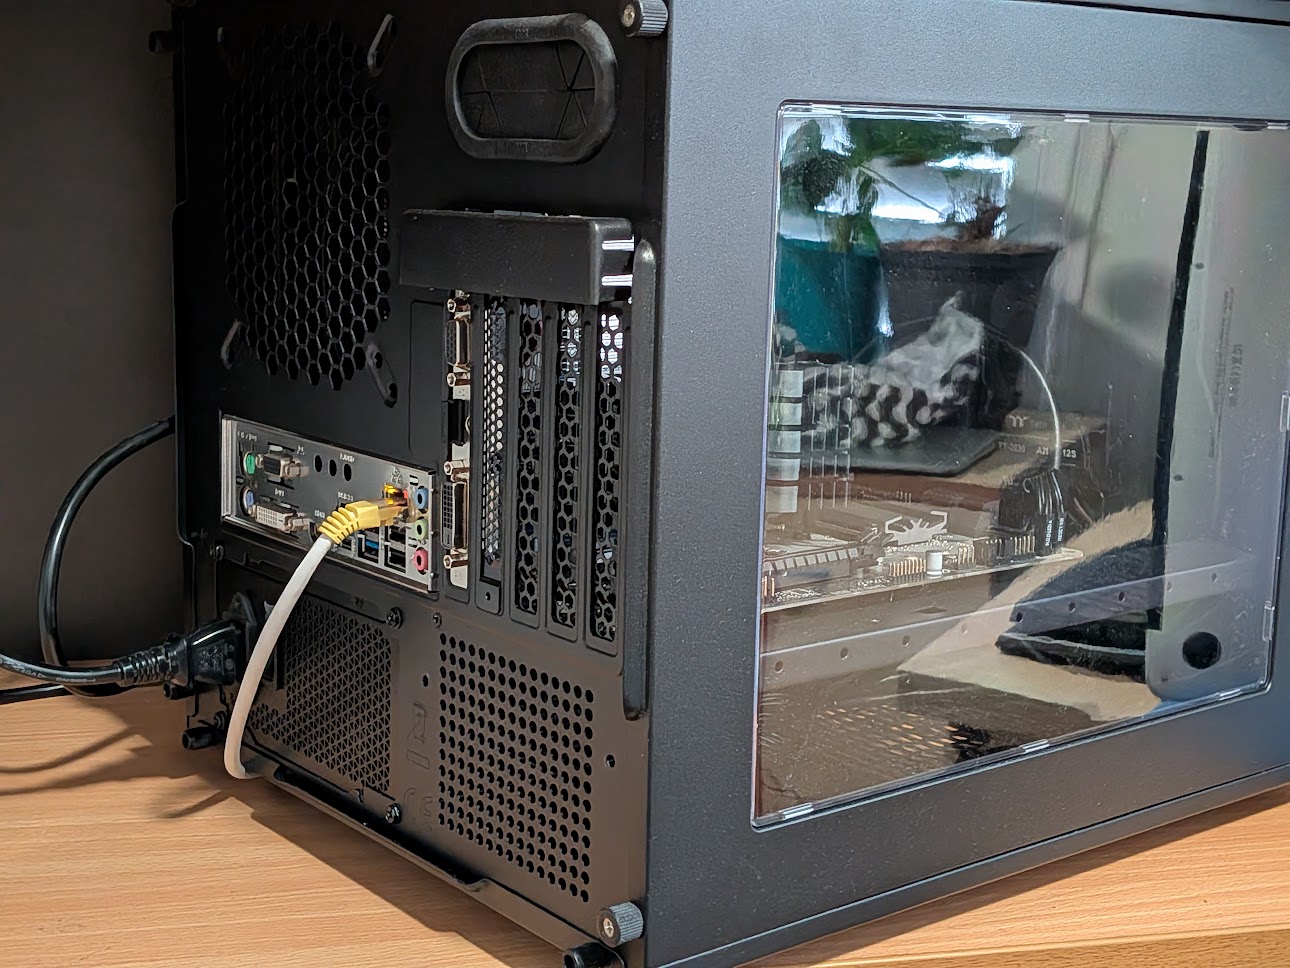
For my Debian 13 server box, I got an el-cheapo graphics card (no fan, sips power) and borrowed a keyboard from another system. As is apparent from the image, the back of the box shows two connections: network and power.
No monitor, no mouse, no keyboard.
To be honest, the graphics card can be removed. It serves no purpose—everything is done remotely, via ssh.
Headless.
🌿
The only thing you will need to jot down during the install of the operating system are:
- name of the box
- user name
- the password
Please note: for the following examples, I'll use the name:
charlotte
as user/login name, and:
i8mainstreet
as server name. Just substitute as needed.
- I named my server by the processor name and our street.
- And, used an alias for user name (one more thing for a hacker to nut out).
- And, used a reasonably solid password. Your box will be outward-facing, remember.
Outward-facing means NextCloud or another intended web service may be reachable from the internet. It does not mean SSH should be port-forwarded to the internet. For remote admin, prefer Tailscale or local-network SSH unless you know exactly why you are exposing port 22.
I found with Debian 13 Server, a lot of things weren't installed—things my other Linux boxes had pre-installed—apps like sudo, curl and ssh. You might want to check whether they are on your installation (do these steps one at a time):
If any of these come back without some text below your command prompt, unlike:
charlotte@i8mainstreet:~$ which curl
/usr/bin/curl
charlotte@i8mainstreet:~$
where bash tells you that 'curl' is installed in '/usr/bin/', you will need to install it. You will definitely want to do this with sudo. You will need to act as super user (su):
and then, as super user:
Now you see why the user name and password is important to jot down.
You can even install all of them as a group:
I had a problem with 'usermod'—it gave me a "not found" error—so I had to install it (I did as su):
Then run, in the following order:
You should see:
whoami → root
a real file listed at /usr/sbin/usermod
dpkg -L passwd → /usr/sbin/usermod
If /usr/sbin/usermod exists, run:
An alternate Debian way to do this (still as 'su') is:
You will need to reboot the system for these changes to take effect. Since you're still 'su' (superuser):
Note: in the past, I used shutdown -r now to reboot.
After you've logged in again, test whether sudo is working:
You will need to enter the system password. You should see:
[sudo] password for charlotte:
root
'root' is the default super user name on Linux systems.
What You See Is Not Necessarily What You Get
By the way, sometimes you should see output after entering a command, like sudo whoami. If you see nothing, something needs fixing. But, that's not always the case. Sometimes you will run a command, and you will simply see the command prompt again: nothing will seem to have happened. In these cases, it meant the command ran successfully—any output would have been an error message... a case of "no news is good news".
🌸
Quick Sanity Check
After you reboot or log out/in, run:
You should see something like:
charlotte sudo
Then test:
Expected:
root
🌸
Key Tools to Install
Before disconnecting from monitor and keyboard, there are three things that need doing:
- Find the IP address
- install ssh server
- login via ssh and verify you're in
Install SSH Server
In an instance of Terminal on the Linux server enter the following:
Note: Do not run this on the Mac/client machine. macOS uses different hostname flags, and this command is intended to reveal the Debian server’s local IP address. On macOS, hostname -I and ip -4 addr are Linux commands and won’t work.
To see local network addresses on a Mac, use:
You are looking for the address that belongs to your home network. In many home networks this begins with 192.168.0.xxx or 192.168.1.xxx. It may also begin with 10. or 172.16 – 172.31, depending on your router.
In my case, the address was 192.168.0.xxx.
If you have tailscale installed, it might include:
100.xxx.xxx.xxx
Your terminal output will almost certainly look different. You want the first tuple: this bit: 192.168.0.xxx where 'xxx' is the last 3 digits in your output. This is the local IP address of that machine.
Jot down this IP address.
Next, find out if ssh-server is already installed on your system:
If it is running, you'll see something like:
charlotte@i8mainstreet:~$ systemctl status ssh
  ssh.service - OpenBSD Secure Shell server
      Loaded: loaded (/usr/lib/systemd/system/ssh.service; enabled; preset: enabled)
      Active: active (running) since Tue 2026-04-21 16:13:00 AEST; 2 weeks 0 days ago
  Invocation: ab12c12345a12d12345678a1234ab123
        Docs: man:sshd(8)
              man:sshd_config(5)
     Process: 705 ExecStartPre=/usr/sbin/sshd -t (code=exited, status=0/SUCCESS)
    Main PID: 736 (sshd)
       Tasks: 1 (limit: 19028)
      Memory: 8.9M (peak: 27.2M)
         CPU: 340ms
      CGroup: /system.slice/ssh.service
              └─736 "sshd: /usr/sbin/sshd -D [listener] 0 of 10-100 startups"

     Warning: some journal files were not opened due to insufficient permissions.
charlotte@i8mainstreet:~$
If SSH is installed and running, you should see:
Active: active (running)
If you see:
Unit ssh.service could not be found
install it with:
and then, enable it (make it active) and check that it is:
What's nice about this is that it will remain enabled by default. Even better: you won't have to manually key in each command (even though sys-admins will tell you it's good practice: True)... you can use [Ctrl]+[C] => [Ctrl]+[V]. Copy => paste.
🌺
Log In On Client
Do this BEFORE disconnecting keyboard and monitor from your server. On your laptop, find Terminal and open it.
Note: I'm not going to give instructions on how to do this in Windows as I don't run Windows anymore. I still have it installed on one system at the moment, but because I never use it and it's taking up 300gig of valuable space, it's likely to go the way of the dodo. These instructions were trialled on a Mac Terminal. They'll work in a Linux box as well.
Enter the following:
Remember to replace with your login name@server name. If it gives you a "permission denied" error, try:
replacing 'xxx' with the last 3 digits of your server's local IP address, all information you carefully wrote down. You will be asked to enter the server password. If you're successful, you will see something like:
charlotte@i8mainstreet's password:
Linux i5Seabrae 6.12.74+deb13+1-amd64 #1 SMP PREEMPT_DYNAMIC Debian 6.12.74-2 (2026-03-08) x86_64

The programs included with the Debian GNU/Linux system are free software;
the exact distribution terms for each program are described in the
individual files in /usr/share/doc/*/copyright.

Debian GNU/Linux comes with ABSOLUTELY NO WARRANTY, to the extent
permitted by applicable law.
Last login: Sun May  3 19:12:27 2026 from 100.66.94.85
charlotte@i8mainstreet:~$
Yay! Good work!
🌺
Docker
Pre-Install
One more useful pre-flight check: make sure there are no conflicting old Docker-related packages already installed. It is unlikely there would be if this is a fresh Debian install, but it's always wise to check. Docker recommends removing things like docker.io, docker-compose, podman-docker, containerd, or runc if present before installing Docker Engine from Docker’s repo.
A couple tools I installed that were missing on the Debian install were net-tools, iproute2, and polkitd (assuming you're still su, otherwise preface the command with 'sudo'):
I also installed polkitd during my setup, but it is not normally required for a basic headless Docker server.
Then, one last confirmation everything is where you need it:
So your pre-Docker checklist is now looking very healthy:
✅ Debian installed
✅ sudo sorted
✅ SSH active
✅ listening on port 22
✅ curl installed
✅ gnupg installed
✅ net-tools installed
If those behave sensibly, we’re ready to install Docker cleanly. 🙂
🌸
Add Docker's Repository
1) Do first:
2) Do next (I would do these commands sequentially, not as a batch):
sudo install -m 0755 -d /etc/apt/keyrings
curl -fsSL https://download.docker.com/linux/debian/gpg -o docker.asc
sudo gpg --batch --yes --dearmor -o /etc/apt/keyrings/docker.gpg docker.asc
sudo chmod a+r /etc/apt/keyrings/docker.gpg
rm docker.asc
3) Follow with:
echo \
  "deb [arch=$(dpkg --print-architecture) signed-by=/etc/apt/keyrings/docker.gpg] https://download.docker.com/linux/debian \
  $ C/os-release && echo "$VERSION_CODENAME") stable" | \
  sudo tee /etc/apt/sources.list.d/docker.list > /dev/null
4) Then, the actual install.
sudo apt update
sudo apt install -y docker-ce docker-ce-cli containerd.io docker-buildx-plugin docker-compose-plugin
5) Test it:
6) Enter this exactly... do not substitute anything:
Membership in the docker group is powerful. Treat it almost like administrator/root access. Only add trusted users.
7) One 'known-good' final checklist to run:
hostname
whoami
groups
sudo whoami
systemctl is-active ssh
docker --version
docker compose version
docker run hello-world
Expected output:
groups includes sudo and docker
sudo whoami returns root
ssh returns active
docker run hello-world succeeds