Repairing Anything
This page started out as a Repairing Macbooks page, but I'm going to put all repairs I do on things here, just to remind myself how it's done.
Repairs on Macs
Some time ago, I bought a used Macbook Pro 2012 for AUD$995.00 plus shipping. As I had read up on Macbooks in general, this particular model stood out as a great system for upgrading. It already had a 500gig SSD (vs HDD) but I needed more space to edit video, so I took out the optical drive, got a caddy to hold another SSD and installed a second drive.
And realised that doing this was fun.
Then Julia dropped her 2011 Macbook Pro, one I'd purchased for $500. The keyboard was what had suffered the most damage, interestingly. Replacing the keyboard on the unibody meant pulling everything out. And having this repair done would have cost well over $200.
Well, pulling a Macbook completely apart was a bit too daunting, at first. However, I finally screwed up the courage and pulled the machine down from the cupboard - where it had been sitting for almost two years - and ever-so-carefully took it apart. I had purchased a new keyboard on eBay for $35. The bit with the keyboard was a nightmare—55 screws the size of a midgie. Got the thing done, anyway.
And the machine worked beautifully!
So, that's what got me started.
Dated Repair Notes
WR-2021.Sep.25
The multimeter (that yellow thing with the knob on it) is, at this point, only there to impress. I haven't actually gotten around to figuring out how it will help me decide what components are defective and need replacing.

Julia got those two tables for free from work... they're moving to smaller quarters and needed to unload stuff.

The logic board in the Macbook Air (2015) that one can see sitting on the farther desk failed as well. It played up and finally refused to work. Got a replacement on eBay for $250... and the seller gave me $50 back for the non-working board! Win-win!
WR-2022.Apr.23
Since the last entry, Julia has organised some melomine bookshelves for my office (again, they were going to throw them out, so she saved them from the landfill!) to put all my bits-n-bobs stuff in. One of the desks is now in use in her office, and I have all this storage space now for my repairs-n-stuff:

I tend to buy stuff that's like the cheapest-ever, crazy-low price. The printer? $50. It's a laser printer. It had a problem: paper wouldn't feed. Kind of a show stopper. The problem was the pick up roller so for $20 or so picked one up, installed it and it works perfectly. I.e., a laser printer for $70.
The monitor in the foreground - actually an iMac 2009:

...which I found on the Facebook marketplace for $100. The guy claimed the OS was installed. No such thing. Thing is: Apple no longer support these devices... too old. Found a solution to that problem, so it actually has Catalina installed now.
And I'm currently working on another Macbook Pro that had been pretty roughly treated: the case had been distorted with the network cable (cat 5) goes in. And grubby-as! but the logic board is fine, needed to replace the keyboard:

... so we'll see what ends up happening to this machine.
Replacing a Battery in a Macbook Pro
Note: *these instructions are mostly from the iFixit site.
Place the macbook face down on some paper towels or flat soft cloth. Do this on a table in a well-lit room. 'Flat' is important, because if you do this in your lap, besides risking the loss of those teeny-tiny screws, as you put the bottom back on it can distort - I know from experience, happened to ME! Remove the bottom case. I've included the screwdriver for these ten screws in the longish box in the Macbook box - the one with the hole in it. You will need to remove:
- Three 14.4 mm Phillips #00 screws
- Three 3.5 mm Phillips #00 screws
- Four 3.5 mm shouldered Phillips #00 screws
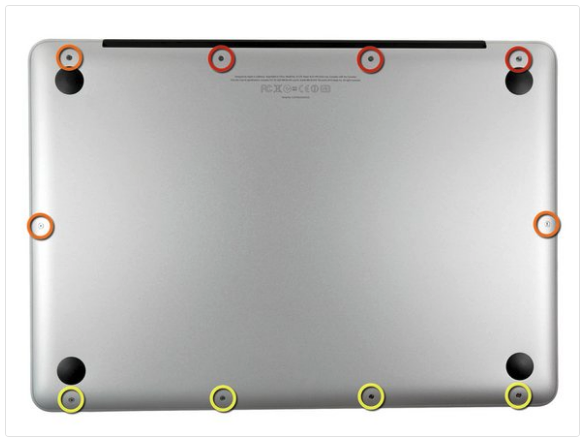
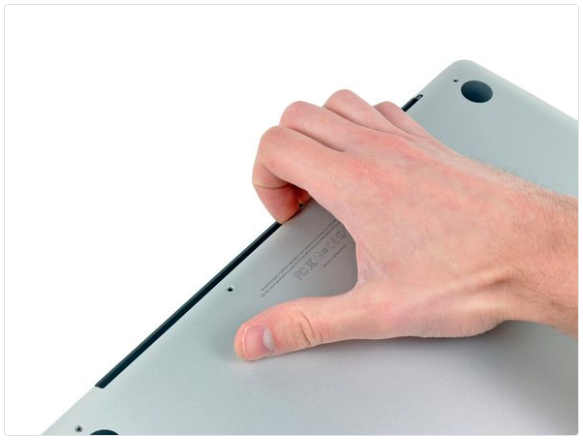
Pry the bottom off with your fingers at the vents.
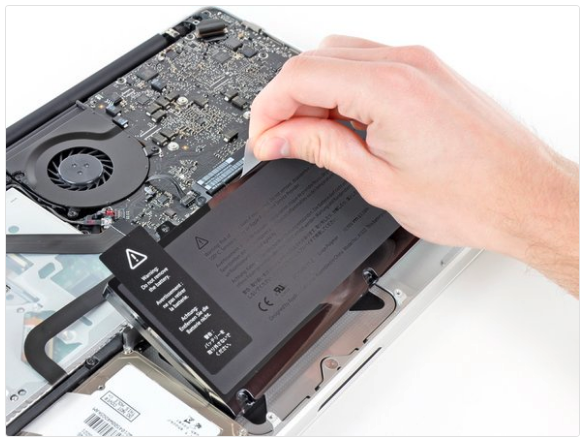
I've included paperwork, a screwdriver for the battery screws (they're tri-point) and the screws in a ziplock bag. Remove all this before sliding in the battery. It only goes in one way:
Attach the following two screws:
- One 5.6 mm Tri-point screw
- One 13 mm Tri-point screw
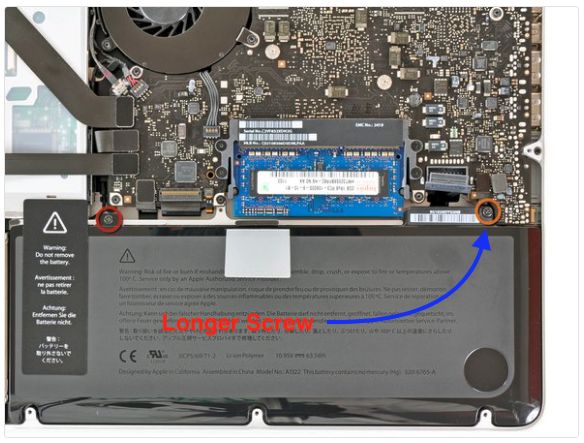
Note on 2022.Apr.25: the longer one goes near the battery connector to the logic board. You may need to slightly adjust the battery a bit for the screw to "take". I have found that if you get the long one started (not tightened completely) and then do the shorter one it's less of a struggle.
Connect the battery connector to the logic board.

Replace the bottom with the vents towards the back (where the screen hinges to the laptop) and screw the bottom in place as shown:
Note: when replacing the small screws, align them perpendicular to the slight curvature of the case (they don't go straight down).
When installing a new battery, you should calibrate it after installation in order to maximise its lifespan:
- Charge it to 100%, and then keep charging it for at least 2 more hours.
- Unplug and use it normally to drain the battery. When you see the low battery warning, save your work, and keep your laptop on until it goes to sleep due to low battery.
- Wait at least 5 hours, then charge your laptop uninterrupted to 100%.
If you notice any unusual behavior or problems after installing your new battery, you may need to reset your MacBook's SMC.
Current Repair Ledger
RL-2022.Apr.29
Replaced the speakers on Julia's 2011 Macbook Pro. This was a bit involved, as one speaker sits next to the CPU on the underside of the logic board, and part of the other speaker sits right on the side of the case, so replacing it involves removing the optical drive. Typical repair quote (see above link) currently runs about AUD$300.00 plus parts.
A Note On the Bottom Screws
I didn't realise this at first, but the bottom of the 2012 Macbook is actually held on by three differeent sets of screws (I thought they were just long and short ones). This bit of advice came from my GOTO iFixit site step one - copy this link into your browser: https://www.ifixit.com/Guide/MacBook+Pro+13-Inch+Unibody+Mid+2012+Battery+Replacement/10365
DosDude1 Patcher
Background
Back when developing the Catalina patcher, u/dosdude1 released this note:
"I have just released version 1.3.6 of Catalina Patcher, which should fix the issue where some third-party applications wouldn't launch. If you have been having this issue, you can either use the latest Catalina Patcher version, or run::
... in Terminal, and then reboot.
Run "sudo nvram boot-args=amfi_get_out_of_my_way=0x1" in Terminal then reboot. That should take care of that issue.
This little fix has been a huge lifesaver. prior to installing it, apps like Microsoft office and chrome and a few others would crash upon launching, after applying it I have found on occasion, that some apps I would later install would not run properly, and I was wondering if there is a way to either:
- reverse this sudo command.
- modify this sudo command so that it doesn't apply to some programs while being effective to others.
- possibly a new sudo command I can use to reverse the effects with certain apps?
5 Comments
tejljr
The Library Validation Patch should fix things like this. This was introduced in Catalina Patcher 1.4.4
RamosHE · 10 mo. ago Besides executing the dosdude1 nvram command. I need to mention that i also turned off gatekeeper using the instructions in the link. But either way al my third-party opening problems are fixed.
mw556 - OP
I will give this a try. thank you.
RamosHE
I had the same problem even when using the latest Catalina patcher version 1.4.4. The "sudo nvram..." command solved the problem of Microsoft office apps, Chrome browser, Edge browser crashing at start up.
Mac Repair Links
CRUCIAL Find My Mac.
Manage the Mac
How to prepare a Mac for sale.
Securely erase data from your Mac
Kernel Driver Not Installed: rc-1908 error
Fan control daemon for Apple Computers running Linux
Running Linux on Mac devices, controlling the SMC
IFixit Pages
2011 Optical Drive Replacement
OpenSource OS Installers
The LegacyPatcher download site,
MrMacintosh's MacOS download site
MrMacintosh's page on downloading full installers for older versions of MacOS
Other Mac-related Pages
Not really for Mac, but a Linux guide to JACK